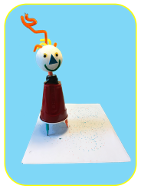
Art Bots are DIY robots that move across your paper in colorful paths with little more than magic marker legs, a body of your choice, and a DC motor.
We first introduced you to Art Bots with our Fidgety Art Bot, which featured a fidget spinner body and a pipe cleaner agitator on the motor for maximum movement capabilities. This Art Bot was just as fun to build as it was to use, but it can cost you close to $2.50 plus the cost of a fidget spinner (unless your kids have one in their closet).
This expense plus the time involved wiring the battery holder to the motor didn’t seem ideal for a classroom setting when time and money are often in short supply. We extended our Art Bot investigation another month as we investigated designs that used minimal materials and money. Our new Classy Art Bot is the result of that investigation and is more conducive to the classroom setting.
Since so much of our Classy Art Bot investigation overlapped with our Fidgety Art Bot, our Investigations tab will be a summary of the two main Art Bot components only, the motor and the body.
Note: Check out our Mystery Art Bot tab, farther down the post, to see what a little imagination can create.
Supplies
SUPPLIES
| Materials | Tools |
|---|---|
| Battery Operated Toothbrush (Battery Included) | Scissors |
| Markers | Utility Knife |
| Styrofoam Ball | Electrical Tape |
| Pencil Cap Eraser | Glue Gun |
| Pipe Cleaner | |
| Misc Accessories | |
| Instant Tacky Adhesive Dots | |
| Paper | |
Note: We were able to reduce the cost of our Art Bots to around $1.25. This cost will vary depending on your choice of decorations and agitator.
Investigation
We built several more Art Bots during this investigation. We used what we learned last month during our The Case of the Fidgety Art Bot to create a more cost-effective design for the classroom that can still spark the interest and creativity of your students.
MOTOR
First, we needed to come up with a more timely and inexpensive motor setup. The motor kit we used last month worked great for our Fidgety Art Bot. The kit allowed us to demonstrate how to connect a switch to a battery pack and motor. The battery holder gave us the height needed to mount our motor higher than the marker legs. This motor kit was engaging and convenient, but our Classy Art Bot was going to need something different.
We focused our efforts on the battery-powered toothbrush from the local dollar store. This would give us the vibration motor as well as the battery for only a dollar.
We were in the process of taking one of the battery-powered toothbrushes apart to see what we could salvage from it when we had our first ‘light bulb’ moment. Instead of disconnecting the internal parts of the toothbrush we realized we could remove just enough from the top of the toothbrush to expose the shaft located on the vibration motor axle. This allowed us to use the toothbrush handle which has the On/Off switch.
BODY
Once we knew what we were using for a motor it was time to experiment with different bodies for our Classy Art Bot. Our first successful design used an 18-ounce squared SOLO cup for a body and a 2 1/2″ Styrofoam ball for a head/agitator. The features of the squared cup were a better fit than the standard round cup, the Art Bot looked appealing for kids, and the plastic cups would be very inexpensive when dividing the cost between 20-30 students. We thought we had a winner until we tested it. Every time we reached inside the cup to turn the switch on or off we ended up with ink on our hands. That’s when we switched to the 9-ounce cup you’ll see in the instructions tab. Its compact size should allow your students to turn their Art Bots on and off without getting ink on their hands.
Teacher Tips
The following tips are meant to help make our Classy Art Bot more conducive to your classroom setting:
![]()
Some of your students may enjoy the challenge of designing their own Art Bot body. Provide your students with the toothbrush measurements and see what they find at home or in your classroom. Let them stretch their imagination.
![]() You may want to purchase the battery powered toothbrushes in advance, depending on your class size. This should prevent your students from finding out the night before the project that the toothbrushes at your local dollar store are out of stock.
You may want to purchase the battery powered toothbrushes in advance, depending on your class size. This should prevent your students from finding out the night before the project that the toothbrushes at your local dollar store are out of stock.
![]() You should purchase a few extra toothbrushes when you pick up the supplies. Since these toothbrushes are inexpensive it’s not surprising that only nine out of the ten toothbrushes we purchased were in working order.
You should purchase a few extra toothbrushes when you pick up the supplies. Since these toothbrushes are inexpensive it’s not surprising that only nine out of the ten toothbrushes we purchased were in working order.
![]() Depending on the age of your students, and the number of parent helpers you have, you may want to do some of the prep work in advance.
Depending on the age of your students, and the number of parent helpers you have, you may want to do some of the prep work in advance.
Classy Art Bot Instructions
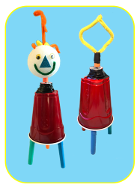
Our Classy Art Bot instructions will show you how your students can build an Art Bot of their own for a fraction of the cost of last month’s Fidgety Art Bot.
Whether you choose to follow our instructions exactly or alter the design to fit your needs we hope your students enjoy the colorful artwork these inexpensive, less complicated Art Bots can still produce.
Step 1 – Supplies:
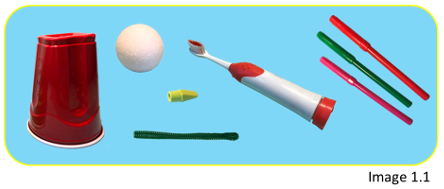
Our goal during this investigation was to cut the supply list down to a minimum. Feel free to add more features if your budget allows.
Note: If you look at our Mystery Art Bot you can see what a few additional supplies and a creative imagination can achieve.
1.1 We found the 9-ounce squared SOLO cup was the ideal size and shape for our Art Bot.
1.2 We purchased our 2 1/2″ Styrofoam balls at the local craft store with a coupon to make them cost-effective. If that isn’t an option for your classroom we recommend you use the pipe cleaner agitator design. It’s inexpensive and will allow your students to change their Art Bot’s path on the fly.
1.3 You will also need electrical tape, Instant Tacky Adhesive Dots, scissors and a glue gun to complete this project.
Step 2 – Testing:
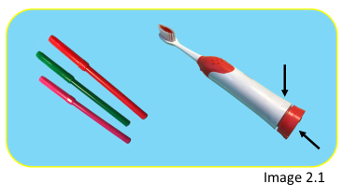
2.1 Test the battery powered toothbrush. The On/Off switch was located at the bottom of our toothbrush with arrows to line up after changing the batteries. If your toothbrush is not vibrating, make sure your arrows are lined up properly before switching to a new battery.
2.2 You should also test your felt tip markers, even if they are brand new. Some of the lighter colors don’t show up as well which could create less colorful artwork. We preferred to use the brighter colors on this project.
Step 3 – Prep Work:
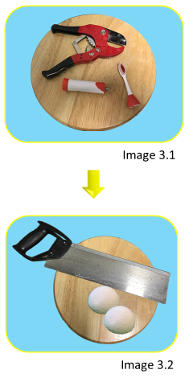
3.1 The head and neck of the toothbrush need to be removed just above where the shaft on the motor axle is located. We tested this step with both a saw and a PVC pipe cutter. Both methods worked without any problems, but the pipe cutter was quicker and easier (Image 3.1).
3.2 If cost is an issue, the Styrofoam ball can be cut in half. Check out our Mystery Art Bot if you’d like to see what a half circle head would look like.
Step 4 – Build:

4.1 The squared SOLO cup comes in a variety of sizes, but we used the 9-ounce cup for this Classy Art Bot (Image 4.1).
4.2 Use a marker to draw a 1 1/2″ X on the bottom of the cup. The X fit perfectly on the indented section of the squared 9-ounce cup (Image 4.2).
4.3 Carefully cut along the X from the previous step and gently lift the triangular sections created from the cuts. This will create the opening needed for the top of the toothbrush so be careful not to lift the triangular sections too far (Image 4.3).
4.4 If you haven’t already tested your battery powered toothbrush, be sure to test it now. It will be harder to troubleshoot any problems once the toothbrush is attached inside the Art Bot body.
4.5 Starting from inside the cup, slowly push the top of the toothbrush through the opening at the bottom of the cup created in step 4.3 (Image 4.4).
Note: Be sure enough of the toothbrush is through the opening so it can be secured with electrical tape. We found pushing the toothbrush through until the top of the motor was even with the tip of the triangular sections worked well (Image 4.4).
4.5 Wrap a 5″ piece of stretched electrical tape around the motor as well as the triangular sections from the opening you cut earlier. Be sure the tape is attached securely to the toothbrush and cup bottom (Image 4.5).
Note: During our Fidgety Art Bot investigation we discovered that the electrical tape adhered best when it is stretched first.
4.6 If you haven’t tested your felt tip markers yet you should do that now. Lighter markers may not create the colorful artwork you’re hoping for.
4.7 Use stretched electrical tape to attach three marker legs, evenly spaced, to the inside of the cup (Image 4.6).
Note: Have your students use two pieces of tape on each leg so the legs don’t come loose during the wobbling movement.
4.8 Use the marker covers as a guide to make sure the marker legs are the same length (Image 4.7).
4.9 Use the utility knife to remove just enough of the Styrofoam ball to fit a pencil cap eraser. Use hot glue to hold the eraser in place (Image 4.8).
4.10 Gently push the eraser over the weighted shaft located on the axle of the motor (Image 4.9).
4.11 Have your students decorate their Styrofoam ball any way they’d like. We found that Aleene’s Instant Tacky Adhesive Dots worked well on the Styrofoam balls (Image 4.10).
Note: Remind your students that the Styrofoam ball will act as their agitator. The more wobbling movement they can create with off-centered pipe cleaners the more interesting artwork they will create.
4.12 We designed hair from pipe cleaners, keeping one pipe cleaner extra-long so we could alter its position at any time (Image 4.10).
4.13 If Styrofoam balls are too expensive for your classroom budget, your students can attach a pipe cleaner directly to the pencil cap eraser with a small piece of stretched electrical tape (Image 4.11).
Mystery Art Bot
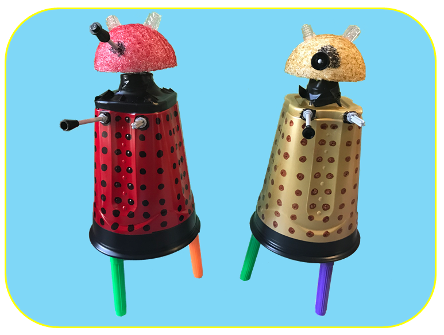
We had our second ‘light bulb’ moment as we were attaching the Styrofoam ball to our first SOLO cup Art Bot. We had a flash of recognition from a classic TV show and designed the two Art Bots below.
We would love to hear from anyone who thinks they know the character we tried to replicate.
