Note: Our Intro to Scratch Programming Mystery (Part 2) is based on Scratch 2.0 and is now outdated. We recommend you check out our Scratch 3.0 Redesign Mystery if you’d like to see what’s new, and then you can head over to our Scratch 3.0 Coding Camp where your kids can earn badges as they work their way through our different programming tutorials.
If you and your kids are new to visual programming you may want to check out last month’s investigation, The Scratch Programming Mystery (Part I). This introduction to the Scratch programming language was divided into two sections for your convenience. A detailed overview of the Scratch editor and its included Paint editor, and a First Scripts section to help your kids become familiar with how to program in Scratch.
This month’s investigation has switched focus towards game design and how you can help your kids take their programming skills to the next level.
DEBUGGING A PROGRAM
Everyone, young and old, will create errors in their program. These errors are called bugs and the process of finding these bugs is called debugging.
Before your kids program their first game you should have them take the time to learn some good debugging skills. Remember, the computer can only do what they tell it to do so if a sprite is doing something wrong, have your kids look at their scripts. Have your kids step through each block and see if they can find the problem. Before they ask you for help have your kids work their way through these questions:
» What seems to be the problem?
» What should I see my program do?
» What am I actually seeing my program do?
» Which of my scripts controls that behavior?
» Have I stepped through this script yet?
Working out the answers to these questions will help your kids solve the problem themselves, but if they’re still having trouble they will be more prepared to discuss the problem with you.
Debug Examples
Debugging Example 1
I have a sprite that doesn’t move correctly. When I press the up arrow, my sprite moves to the right. When I press the down arrow, my sprite moves to the left. Can you find the bug in the script below?
![]()
Note: See the Debug Solutions Tab for the Answer
Debugging Example 2
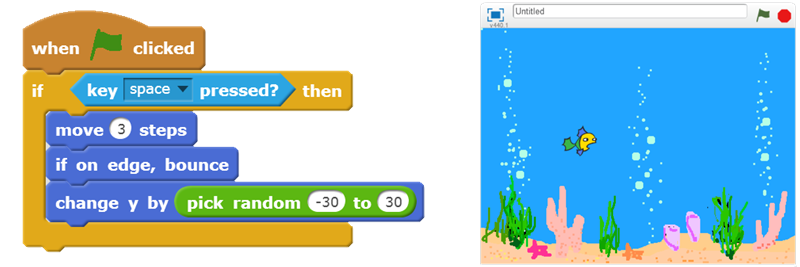
I have a fish sprite that I want to swim back and forth with the space bar, but it only moves once. Can you find the bug in the script below?
Note: See the Debug Solutions Tab for the Answer
Debugging Example 3
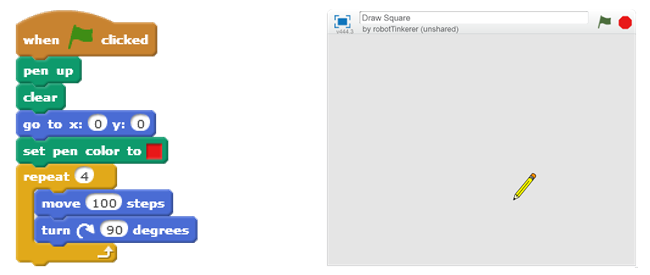
My pencil sprite is supposed to draw a square but when the pencil moves I can’t see the square being drawn. Can you find the bug in the script below?
Note: See the Debug Solutions Tab for the Answer
Debugging Example 4
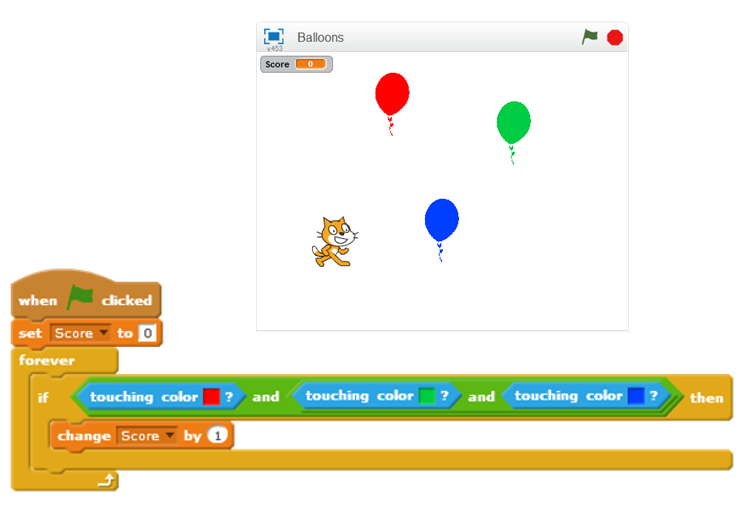
My Scratch sprite is supposed to score points every time he touches a balloon but the score variable never updates. Can you find the bug in the script below?
Note: See the Debug Solutions Tab for the Answer
Debug Solutions
Solution to Debugging Example 1
![]()
The Motion blocks used in the above scripts changed the x coordinate, not the y coordinate.
Solution to Debugging Example 2

Without the ‘forever’ Control block surrounding the rest of the blocks in the above script, the script will only run through each block the one time.
Solution to Debugging Example 3

The ‘pen down’ block is missing from the above script. The use of the ‘pen up’ and ‘pen down’ blocks are very important when programming drawing scripts.
Solution to Debugging Example 4
The ‘if touching color’ Control blocks are being checked with an ‘and’ Operator block instead of an ‘or’ Operator block in the above script. This statement will only return true when the Scratch sprite is touching all three colors at the same time. The above script needs to use the ‘or’ Operator block so the statement will return true when the Scratch sprite touches any one of the specified colors.

GAMES
(Game Design Worksheet Template)
What makes a great video game? A good design! The design phase is very important, so we’ve included a design template for your kids to use.
Whether your kids want to design a game to solve puzzles, jump over dangerous objects, fly a spaceship, or defend a castle from enemy forces the following tips will help them design a game that will keep their friends coming back for more.
Choices
A continuous flow of fun, interesting choices for the player is important. If the choices are boring or non-existent your kids risk losing the player’s attention.
Challenge
Have your kids design their game to be challenging but not too difficult. This can be tough but well worth their time. The goal is for them to engage the player and keep him/her coming back for more.
Game Play
The way in which the player will interact with your kid’s game is important. If the controls are awkward and hard to use, the player will move on to something else. Help your kids keep it enjoyable.
Storyline
Not all games need a storyline but if your kid’s game does, be sure it’s interesting enough to keep the player interested in what happens next. If your kids can keep the player curious, success is in their future.
The following two games are similar to two huge successes of their time. The very idea of being able to program games so similar to such huge successes should encourage your kids to get their creative juices flowing!
Note: We wrote these instructions during our investigation using the online editor. If you prefer the offline editor, keep in mind that there will be slight variations with the features available. Also, the software continues to be updated so these steps may change slightly over time.
Table Tennis
(Table Tennis Game Design Worksheet)
Pong, a table-tennis game, was created in the early 1970’s by Allan Alcorn as a training exercise while he worked at Atari. Pong was a huge success and helped establish the video game industry into what it is today.
Have your kids take a few minutes to look over our table tennis game design worksheet. This should help them get an idea of what we’re doing as they work through our instructions below.
Start New Program
1. Create a new program by clicking on the File menu, then clicking New.
2. Go to the box just above the Stage and change the name of the program from Untitled to Table Tennis.
3. Pay attention to the Save now item on the File menu (also found in the top right corner of the editor before an autosave has occurred). Even though the online editor saves automatically, it’s not immediate and using Save now before exiting will prevent the unfortunate loss of data.
Note: At the time of this post the Scratch offline editor did not autosave. Be sure to save frequently if you’re using this editor. We’ve seen more than one kid lose their work by not saving.
Prepare Background
1. Click on the scissors button located along the top of the editor, near the center, then click on the Scratch Sprite that appears in every new project to delete this sprite.
Note: You should be able to right-click on a sprite and select delete, but at the time of this post we were having trouble with this feature.
2. Click on the Stage icon located to the left of the Sprite List if it’s not already highlighted then click on the Backdrops tab near the top center of the editor, so the Paint editor is visible.
3. Make sure the Paint editor is in Bitmap Mode before you create your background.
4. To switch background color, select a color of your choice from the color palette, select the paint bucket icon on the left side of the Paint editor and then click anywhere on the background.
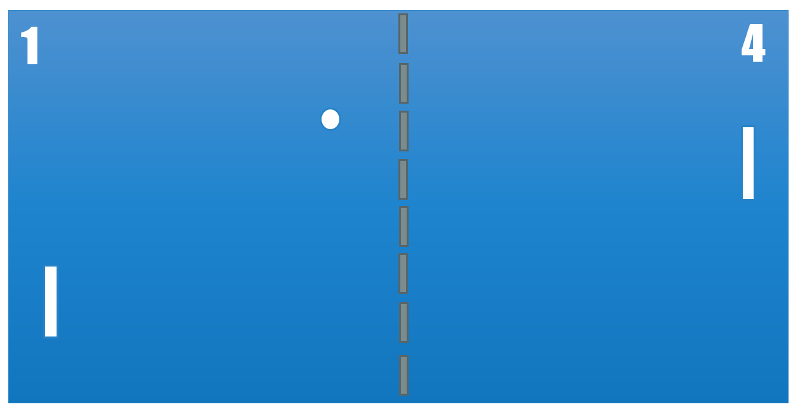
5. Select a new color and then use the rectangle tool to create a dotted line down the center of your background.
Note: You can draw a single, long line down the center of the stage and use the eraser tool to remove sections to create the dotted line or you can draw one section of the dotted line and use the select and duplicate tool to create the rest of the sections. Refer to the background template below to get an idea of what this should look like.
6. Select the Scripts tab to leave the Paint editor now that your background is finished.
Create & Program Paddles
1. Select the paintbrush icon located on the right-hand side of the Sprite List to create a new sprite in the Paint editor.
2. If necessary, use the zoom tool (the + symbol from the – & + symbols next to the color chart) to zoom in so you can more easily see the checkerboard pattern as well as the costume center mark in the editor.
3. Select a color and use the rectangle tool to create a paddle about 2 squares wide and 13 squares in length. Be sure to center the paddle with the costume center mark and use a color different from the background so it will be visible.
4. Click on the background while in the Paint editor or the Scripts tab when you are finished so the paddle will appear in the Stage area.
5. Once visible, select the paddle in the Stage area and move it to the top left side of the stage.
6. Click on the blue info (i) icon on the new sprite in the Sprite List and change the name to Paddle 1.
7. If you’re still in the Paint editor, select the Scripts tab near the top center of the Scratch editor to program your script for this sprite.
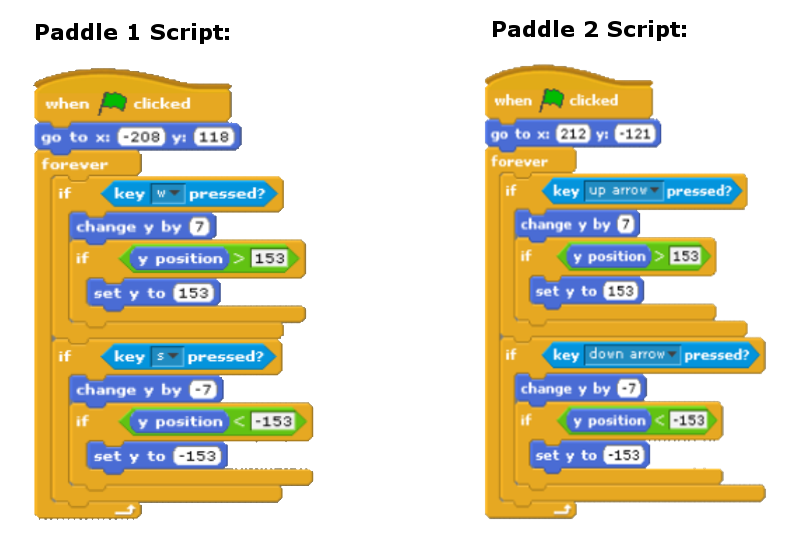
8. Find the corresponding blocks from the Block Palette to match the Paddle 1 script below.
Note: You may have to change the numerical values a little once you are finished depending on the size of your paddle.
9. Once you’ve tested that you can move Paddle 1 up and down right click on the paddle and select duplicate to create a second paddle.
Note: This is another feature affected by our inability to right-click on a sprite at this time. You may need to use the duplicate button located along the top of the editor, next to the delete button. Click on the stamp symbol, then on the sprite to create the duplicate.
10. Name this new sprite Paddle 2, move it to the bottom right of the stage and change the values of the blocks to match the Paddle 2 script below. Change the values as needed.
Note:
» Use the ‘go to x: y: ‘ blocks at the beginning of scripts so your sprites start in their original positions at the beginning of each new game.
» The a, w, s, d keys are the standard keys to use for motion along with the arrow keys for multi-player computer games.
» The ‘if y position > ?? ‘ and ‘if y position < ?? ‘ checks are used to keep the paddles on screen. You may need to change the values a little in your script.
» Change the values in the ‘change y by ?? ‘ blocks if you want to change how far the paddles move each time you select the corresponding key.
Create & Program Ball
1. Select the paintbrush icon on the right-hand side of the Sprite List to bring up the Paint editor.
2. Use the zoom tool to zoom in one or two clicks (+ symbol).
3. Use the ellipse tool to create a solid ball 5 squares in diameter.
Note: Choose any color other than the background color or your ball will not be visible against the background.
4. Click on the background in the Paint editor or the Scripts tab to make the ball appear in the Stage area.
5. Move the ball to the center of the stage, away from the paddles.
6. Select the Scripts tab to program the scripts for this sprite.
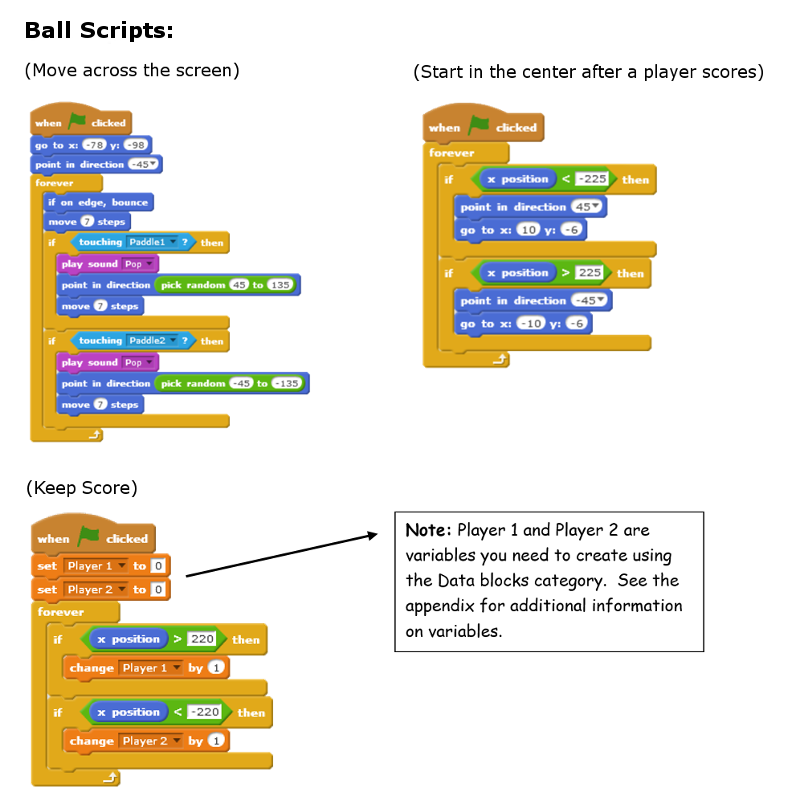
7. Find the corresponding blocks from the Block Palette to match the three ball scripts below.
Challenge: Have your kids modify the table tennis game with their own personal touches!
Flappy Parrot
(Flappy Parrot Game Design Worksheet)
Our second game is based on a very popular mobile app, Flappy Bird, that had a surprising jump in popularity in early 2014. We added this side-scroller game to our investigation as proof that a hit game doesn’t always have to be complex.
Have your kids take a few minutes to look over our Flappy Parrot game design worksheet. This should help them get an idea of what we’re doing as they work through our instructions below.
Start New Program
1. Create a new program by clicking on the File menu, then clicking New.
2. Go to the box just above the Stage and change the name of the program from Untitled to Flappy Parrot.
3. Pay attention to the Save now item on the File menu (also found in the top right corner of the editor before an autosave has occurred). Even though the online editor saves automatically, it’s not immediate and using Save now before exiting will prevent the unfortunate loss of data.
Note: At the time of this post the Scratch offline editor did not autosave. Be sure to save frequently if you’re using this editor. We’ve seen more than one kid lose their work by not saving.
Prepare Background
1. Click on the scissors button located along the top of the editor, near the center, then click on the Scratch Sprite that appears in every new project to delete this sprite.
Note: You should be able to right-click on a sprite and select delete, but at the time of this post we were having trouble with this feature.
2. Click on the Stage icon located to the left of the Sprite List if it’s not already highlighted, then click on the Backdrops tab near the top center of the editor so the Paint editor is visible and in Bitmap Mode.
3. We’re going to get a little more creative with this background, drawing a sky and some grass.
4. Select the lightest blue from the Color Palette, select the paintbrush tool and draw a horizontal blue line across the background about a third of the way up from the bottom for the skyline. Be sure the line reaches to the very edge on both sides.
5. Select one of the darker shades of blue, select the bucket fill tool and click on the background above the light blue line. If the fill tool filled both sides of the line, then there is a gap in the line, most likely near the edge. Close the gap and try again.
6. Select a darker green from the Color Palette for the grass and click on the background below the light blue line (The bucket fill tool should still be selected).
Challenge: Feel free to play around with the fill tool’s gradient options found to the left of the Color Palette to create a more artistic background.
7. Select the Scripts tab to leave the Paint editor once your background is finished.
Create & Program Pipes
1. Choose the Parrot sprite from the Sprite Library.
2. Right-click on the sprite’s blue info (i) icon and change the name to Parrot.
3. Select the shrink tool near the top of the editor and then click on the parrot sprite 10-12 times to make the parrot small enough to fly between the pipes.
Note: Even though we are not ready to program scripts for our parrot, we do need it in the stage area for use with our pipe scripts below.
4. Select the paintbrush icon on the right-hand side of the Sprite List to create a new sprite in the Paint editor.
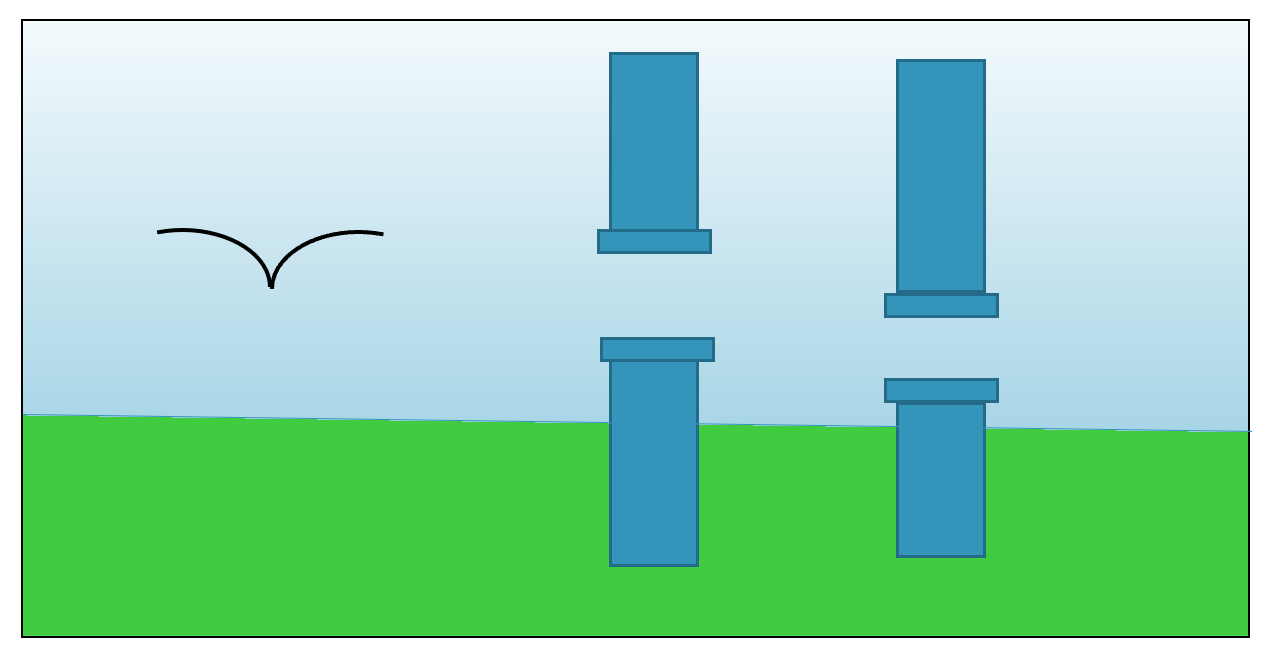
5. Select a color of your choice and use the rectangle tool to create one set of pipes similar to the background template above. The sprite should consist of two pipes, one tall pipe on the bottom and one short pipe above it. The parrot sprite will fly through the gap. Make sure it’s wide enough to fly through but not so wide it isn’t a challenge.
6. Make sure that the top pipe is flush with the top of the Paint editor and the bottom pipe is flush with the bottom of the Paint editor. This will make the pipes line up with the top and bottom of the background.
Note: The costume center mark should be at the center of the whole sprite, not on just one of the pipes.
7. Click on the sprite’s blue info (i) icon and change the name to Pipe 1.
8. Find the corresponding blocks from the Block Palette to match the Pipe 1 scripts below. The values will need to be changed slightly to work with your sprites.
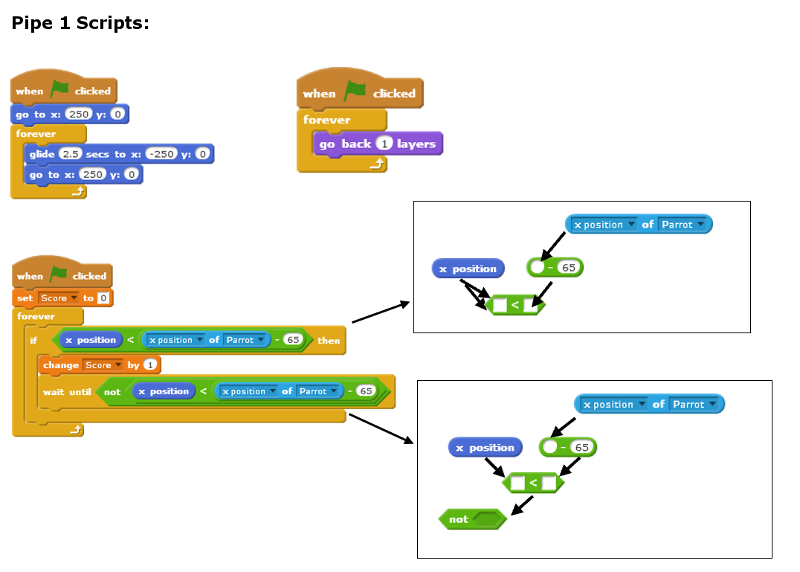
» The top left script above moves Pipe 1 to the far-right side of the background and then glides it slowly to the left, scrolling it across the screen continuously.
» The top right script keeps Pipe 1 back one layer, so it doesn’t pass in front of the parrot or score.
» The bottom left script monitors Pipe 1’s x position until it passes the parrot. Each time this happens one point is added to the score.
Note: As you gain more experience with Scratch you will start to program more complex scripts, and find yourself stacking several blocks on top of each other as seen in the Scoring script above.
9. Click on the green flag at the top of the stage area to be sure Pipe 1 moves smoothly across the background area. Change values as needed.
10. Once the Pipe 1 sprite works correctly right-click on it and select Duplicate. The new sprite should be named Pipe 2 automatically but if not, change it now.
11. Select the Costumes tab, go to the Paint editor and select the flip up-down button at the top right corner of the editor. There should now be one short pipe on the bottom and one tall pipe above it.
12. Switch to the Scripts tab and modify the scripts that were duplicated with the sprite to match the Pipe 2 scripts below. The values will need to be changed slightly to work with your sprites.
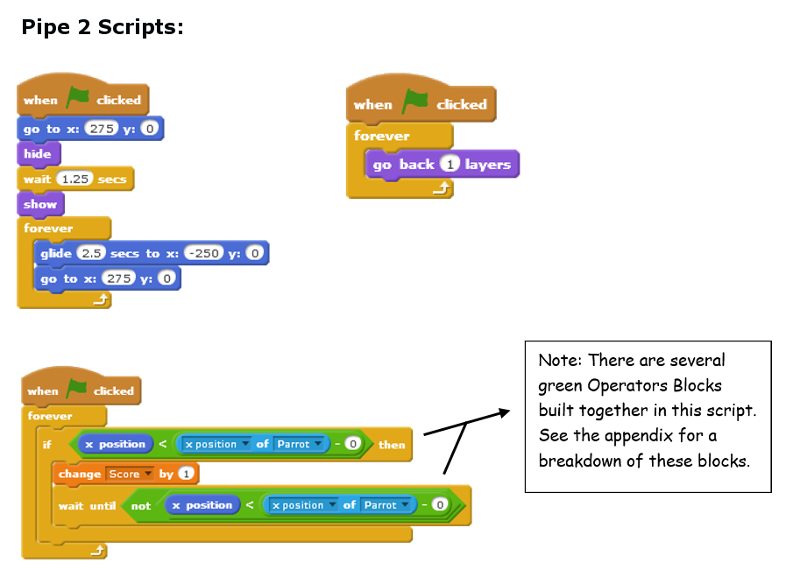
Note: The Pipe 2 scripts are slightly different than the Pipe 1 scripts. Script 1 includes the blocks to hide the pipe as it waits at the very edge of the screen until Pipe 1 has started scrolling and Script 3 has slightly different values.
Program Parrot
1. We are now ready to program the Parrot sprite created earlier. If you haven’t already done so rename the sprite to Parrot and use the shrink tool to make the parrot small enough to fly through your pipes.
2. Find the corresponding blocks from the Block Palette to match the Parrot scripts below.
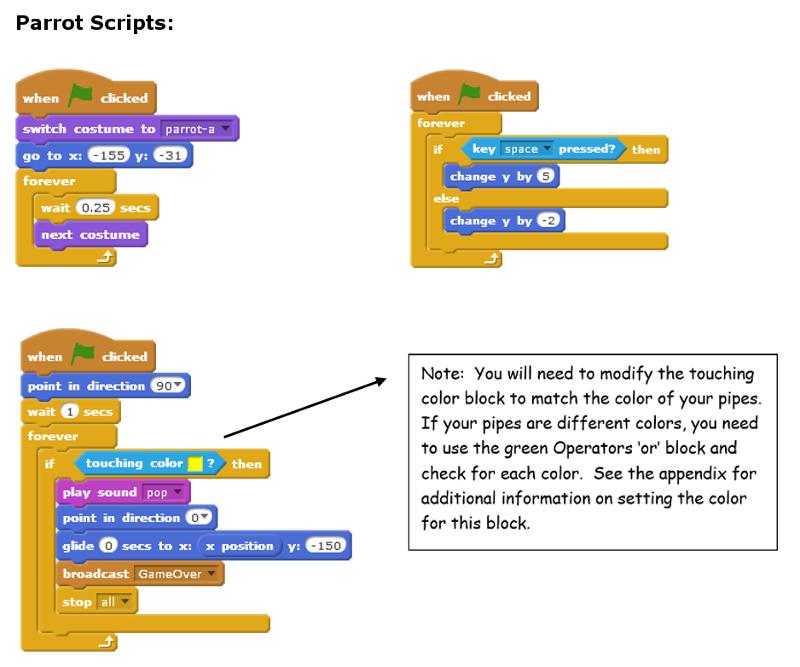
» The top left script alternates between the two parrot costumes to make the parrot fly.
» The top right script makes the parrot fly higher every time the space bar is clicked, otherwise it starts to fly lower.
» The bottom left script monitors the parrot until it touches a pipe. When it does, game over!
Challenge: Have your kids modify the Flappy Parrot game with their own personal touches!
