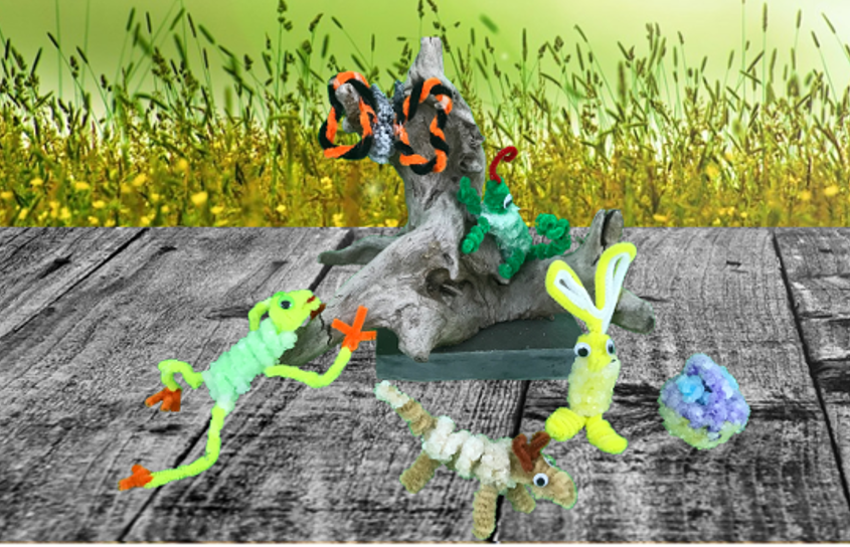
We Hope You Enjoy Your DIY Borax Crystal Critters
If you’re ready to start your DIY Borax Crystal Critters now and prefer to read about the winter survival skills of your favorite backyard critters later, feel free to use the following links.
DIY Borax Crystal Critters Printable Instructions
DIY Borax Crystal Critters Step by Step Instructions
Safety Warning: Keep all chemicals used in this activity away from younger children. Avoid unnecessary contact, don’t rub it in your eyes, and do not ingest. This project requires adult supervision.
The days are warmer, the daffodils and crocuses are blooming, and your backyard critters are coming back. Whether they were gone due to hibernation or migration it’s nice to see that first butterfly flitting through the air. Or hear the first trill of the gray tree frog somewhere in the trees. And let’s not forget about those who stayed behind. What adaptation skills did these critters use to stay in your backyard through the cold winter months? Help your kids create their own DIY Borax Crystal Critters while they learn about the incredible feats some backyard animals accomplish to survive the winter months.
If this is your first time creating DIY crystals, you should check out The DIY Valentine Crystals Mystery for a quick lesson on the science behind crystals and the seven crystal systems. You can also read about why we chose Borax for our DIY crystals instead of Alum powder or Epsom Salts.
Hibernation
Hibernation
Many backyard animals find it hard to locate food during the winter and their bodies can’t handle the colder temperatures. Hibernation is a type of deep sleep that allows animals to sleep through cold winter months when food is scarce. Their hearts beat slower, they breathe less, and their body temperature drops. Whether they curl up in a hollow tree trunk or nestle in a burrow, they sleep through the cold. A variety of insects, amphibians, reptiles, and even fish are known to hibernate.
Note: Not all animals in our hibernation table below truly hibernate. The more we investigated, the more we learned that some animals enter a lighter state of sleep called torpor, and cold-blooded animals enter a state known as brumation.
Hibernation vs Torpor
Torpor is a hibernation-like survival mechanism used by animals to slow their heart rate, breathe less, and lower their body temperature. The distinction between the two is hibernation is voluntary, but torpor is an involuntary result of the cold temperature outside.
Hibernation vs Brumation
Brumation is another hibernation-like survival mechanism but involves cold-blooded animals such as reptiles and amphibians. Unlike mammals, cold-blooded animals stop eating before ‘hibernation’ since cold temperatures prevent them from being able to digest their food. Another distinction from mammals is that cold-blooded animals can’t regulate their body temperature to make it lower. Their body temperature is lowered by the temperature of their surroundings.
Note: Did you know that the place where an animal chooses to hibernate is called a hibernaculum?
| Backyard Animal (Type of Winter Deep Sleep) | When | Where | With or Without Food | Alone or With Others | |
|---|---|---|---|---|---|
| Bats (Torpor) Note: Not all bats hibernate. Some live in climates warm enough to find food year round and some migrate. | Late Fall - Mid March | Caves, Hollow trees, Buildings, (someplace warm, dark, and quiet) | Without Bats that hibernate will go into a deep sleep, only waking to drink any moisture available and urinate. | With other bats. | |
| Box Turtles (Brumation) Note: Captive box turtles don't always hibernate due to the controlled environment. | Mid Sep/Oct - Spring (varies with the local climate) | Stump holes, Abandoned animal burrows, or in burrows they dig in dirt or stream beds. | Without Turtles stop eating in order to hibernate with an empty stomach. | Either way. | |
| Bumble Bees (Hibernation) Note: All bees but the queen will die off in the fall. | Fall - Spring | In the soil, somewhere that avoids the winter sun. | Without The queen bee has been eating pollen since spring so her body will have enough nourishment to sustain her through hibernation. | Alone | |
| Chipmunks (Torpor) | Winter - Spring | Deep, complex burrows with chambers for sleeping, storing food, and defecating. | With Chipmunks don't have fat reserves, they wake from hibernation every few days to eat from their stockpile of stored food. | Alone | |
| Garter Snakes (Brumation) | Late Sep/Early Oct - Mar/Apr | Woodlands, Grassy areas, Meadows. | Without | With others, the more the merrier. | |
| Hedgehogs (Hibernate) | Oct/Nov - Mar/Apr | Under sheds, wood piles, even brambles or tree roots. | Without Survives off its fat stored up over the summer. | Alone | |
| Snails (Hibernate) Not all snails hibernate, those that do seal their shell opening with a dry layer of mucus to stay moist during hibernation. | October - April | Cracks in walls, Under stones, Deep in leaf litter where frost won't reach. | Without | Either way, very often together. | |
| Wood Frogs (Hibernate) | Winter - Spring Frogs have a high concentration of glucose in their major organs to prevent them from freezing. | Tree crevices, Logs, Rocks, Deep leaf litter. | Without | Alone | |
Top of Tab
Top of Post
Migration
Migration
Not all backyard animals have the ability to hibernate as food becomes scarce and temperatures drop. Another defense against harsh winter months is migration, which is when animals relocate to a more suitable climate until spring. A variety of insects, amphibians, reptiles, fish, and birds are known to migrate.
How do these animals know when to migrate? How do they know where to go? We’ll answer these questions when we can, but even scientists are still trying to figure some of this out.
During our investigation into insect migrators, we read about some impressive steps scientists have taken to understand the migration habits of the green darner dragonfly. Check out this Smithsonian Magazine article for an in-depth look at how scientists have been studying the migration patterns of the green darner dragonfly.
Another discovery during this research was how inconsistent online information can be as scientists unravel the mysteries behind insect migration. We read several interesting facts about the Painted Lady butterfly that we didn’t include due to these inconsistencies.
We read that the Painted Lady can be found on all continents except:
- Antarctica
- South America and Antarctica
- Australia and Antarctica
And when we concentrated on just the North American Painted Lady, we still ran into inconsistencies on where they spend the winter months.
| Backyard Animal | Migration Trigger | When | Where To/From | Distance | |
|---|---|---|---|---|---|
| Canada Goose | Temperature | Sep/Oct - Spring | Migrates to: Southern US between California and South Carolina Northern Mexico | 2,000-3,000 miles with average speeds of 40 mph (can reach 70 mph with a strong tailwind). Fly back in order to mate and nest in same area where they were born. Known to be permanent residents in areas with milder climates. |
|
| Green Darner Dragonfly | |||||
| ---- 1st ---- Generation | Temperature | Feb/March - May | Migrates from: Southern US, Mexico, & Caribbean | Temperature triggers the 1st gen dragonfly larvae to emerge and mature. 1st gen dragonflies travel hundreds of miles north to New England or the upper Midwest to lay the 2nd gen eggs then die. |
|
| ---- 2nd ---- Generation | July - October | Migrates from: New England or the upper Midwest | Mature 2nd gen dragonflies travel hundreds of miles back to Southern US, Mexico & Caribbean to lay the 3rd gen eggs. The 2nd gen still in the nymph (larva) stage stay north and spend the winter in local ponds and lakes. |
||
| ---- 3rd ---- Generation | Winter | Non-migratory: Stay in Southern US, Mexico & Caribbean | Distance N/A This generation stays south to lay the eggs that start a new cycle of migrating dragonflies. |
||
| Monarch Butterfly | Day length Temperature changes | October (sooner if weather turns cold earlier than usual) | US Monarchs that live east of the Rocky Mountains migrate to Mexico to roost in oyamel fir trees. US Monarchs that live west of the Rocky Mountains will migrate to Pacific Grove, California to roost in eucalyptus trees. | Up to 3,000 miles, depending on where they started. | |
| Ruby-throated Humming Bird | Instinct Day length Change in nectar and insect supply | Late August - mid-September | Central America or southern Mexico. | Up to 500 miles, depending on where they started. | |
Top of Tab
Top of Post
Adaptation
Adaptation
What about the backyard animals that stick around during the cold winter months? These animals have learned to adapt to survive. Squirrels gather and store extra food before winter comes so they have enough to eat until spring. Birds eat high-energy diets during the day to generate more body heat at night. Rabbits grow thicker fur for the added warmth against the winter elements and sometimes this new fur will be a different color to blend in with the new environment.
| Backyard Animal | Adaptation | |
|---|---|---|
| Cardinals | Loose their territorial instincts during the winter months, spending more time in flocks. Puff up to trap air pockets around their bodies to stay warm and minimize heat loss. Add on extra body weight in late summer, early fall in preparation for the cold winter months. |
|
| Chickadees | Gather in large groups to stay warm at night. Generate heat by shivering (activating opposing muscle groups to create muscle contractions in order to retain heat). Eat a lot in order to maintain their body temperature around 100 degrees. Use spatial memory to remember where they stored extra food during the fall. This spacial memory exists due to their hippocampus, which gets larger in the fall. On extremely cold nights, chickadees slip into a state of controlled hypothermia known as torpor, dropping their body temperature lowers by twenty degrees. By dawn, they will come out of torpor and use shivering to get their body temperature back to normal. Molt in the Autumn, with new feathers coming in more dense with 25% more feathers. Puff up to trap air pockets around their bodies to stay warm and minimize heat loss. Add on extra body weight in late summer, early fall in preparation for the cold winter months. |
|
| Rabbits | Switch their diet to woody parts of plants. Eat their own feces pellets. Stay still more often to conserve energy/body heat. Come out at dusk and dawn instead of during the day due to milder weather at these times. Sleep more. |
|
| Sparrows | Shelter in dense foliage or cavities with others to avoid bad weather and share body heat. Stick out their feathers, tuck in their head and feet. Puff up to trap air pockets around their bodies to stay warm and minimize heat loss. Add on extra body weight in late summer, early fall in preparation for the cold winter months. |
|
| Squirrels | Fatten up for the winter. Store caches of food in small holes that get covered up (and sometimes forgotten) until needed. Spend more time in their den. Several squirrels will often share a den during the winter months to keep each other warm. Generate heat by shivering. |
|
Top of Tab
Top of Post
DIY Borax Crystal Critters
DIY Borax Crystal Critters Printable Instructions
If you’re about to make Borax crystals for the first time, you may want to check out the Tips & Tricks tab for valuable crystal making information. This month’s investigation dealt more with how to make the cutest pipe cleaner critters possible while maintaining optimum crystal formation, not the crystal making process itself. If you’ve already seen our The DIY Valentine Crystals Mystery then you will recognize our tips on making Borax crystals.
Supply List
| Materials | Tools |
|---|---|
| Borax | Stove or Microwave |
| Pipe Cleaners | Measuring Cup & Tablespoon |
| Straws | Stirring utensil |
| Water | Scissors |
| Food Coloring (Optional) | Needle & Thread |
| Clear Sealant (Optional) | Pan or Microwave Safe Dish |
| Container for the Crystal Base/Saturated Solution. | Needle Nose Pliers (Optional) |
Note: We built our DIY Borax Crystal Critters with a variety of pipe cleaners and two cups of a saturated solution containing 14-15 tablespoons of Borax for a total project cost of $0.75, but the upfront cost for a box of Borax will run around $5.00. You should be able to find the rest of the necessary materials and tools around your house.
Top of Tab
Top of Post
Step by Step Instructions
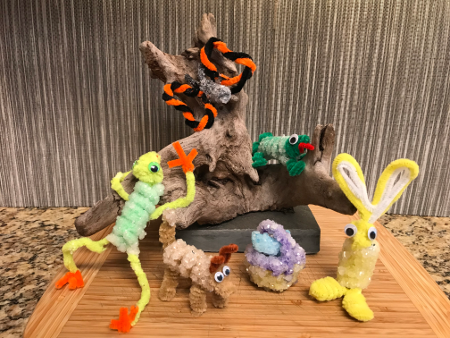
Our DIY Borax Crystal Critters were a lot of fun to make, but we’re still working on our ability to make a decent animal head. The head can be a bit challenging, but we decided on a coiled body that will be easy for your kids to make. The coiled body was easy to make, the same style body worked for multiple critters, and the crystals formed on the coiled pipe cleaner every time. If your kids prefer to make a body of their own or they want crystals to grow on other parts of their critters, let them go for it. What better way to capture your kid’s attention than to let them personalize this project?
Note: Our crystal dog and chameleon were two of our favorite critters during this investigation, not only because they’re so adorable, but because they’re the perfect examples to use in our instructions below. Your kids can easily modify their poses with slight alterations to their legs or curls in their tail. Help your kids design their dog in a playful ‘downward dog’ pose with a crystallized ball designed out of pipe cleaners next to him. Or help them curl the legs of their chameleon inward so it can grab hold of a pencil or small branch.
DIY Borax Crystal Critters Procedure
The first step in making DIY Borax Crystal Critters is having your kids create their pipe cleaner critters and deciding which sections they’d like their crystals to grow on. Cover any section you want crystal-free with a piece of straw. We grew crystals on our critters’ bodies and sometimes their tails.
Once the critters are ready, soak them in the Borax solution. Any exposed areas will act as a base for the Borax crystals to attach to. Your kids may enjoy checking on their crystal growth periodically, so a clear container for the Borax solution would be ideal.
To create the Borax solution, help your kids dissolve the Borax powder in hot water until the solution is fully saturated. You’ll know your solution is ready when the hot water becomes cloudy and Borax powder starts to settle on the bottom of the pan.
Crystals will begin to form once the solution is poured in the critter container to cool. This occurs because hot water holds more Borax than cold water, causing crystals to form as the Borax ‘falls’ out of the cooling solution. The hot water holds more than the cold because the higher the water temperature, the more space between molecules, allowing more room for the powder.
The sections covered by a piece of straw will be too smooth for any decent crystal formation, and any crystal that does form can be carefully removed as you remove the straws from your critter.
Note: As we mentioned in The DIY Valentine Crystals Mystery, cooling your Borax solution slowly by placing the container in a pan of hot water will create larger crystals. We preferred the smaller crystals for our pipe cleaner bodies, but it’s another area your kids can experiment with.
Step 1 – DIY Borax Crystal Critters Supplies

Note: Make sure your solution container is large enough to hold your kid’s pipe cleaner critter without touching the sides or bottom of the container.
Step 2 – DIY Borax Crystal Critters Build Steps
If your kids are anything like us here at STEM Detective Lab, they’re going to want to keep building pipe cleaner critters after this project is finished. One option is to turn these extra critters into Critter Bots, Brushbots with personality and cuteness. Check out The Case of the Vibrating BrushBot for an in-depth look at creating Brushbots. We may add a post on Critter Bots later in the year, but you shouldn’t have trouble modifying our vibrating Brushbots into Critter Bots.
Body
2.1 Have your kids pick the color of pipe cleaner they’d like to use for their critter’s body. Help them wrap the whole pipe cleaner around a sharpie marker or another round object about the same diameter. This size coil, covered with crystals, ended up with a center hole that was the perfect size for attaching the head. Plus, this size coil created a body light enough for the legs to support (see Image 2.1).
Legs
2.2 Once your kids decide on a color for their critter’s legs, help them cut their 2nd pipe cleaner in half. Set one half aside, then help your kids cut the other section in half again. These two 1/4 length pieces of pipe cleaner will be the two sets of legs for their critter.
2.3 Thread one of the 1/4 length sections of the pipe cleaner around the second loop at one end of your coil, then fold it in half. Be sure that the pipe cleaner section is folded up and around the second loop of the body, then twist it together a couple of times (like a twisty tie on a loaf of bread) to secure the legs to the body. Repeat this for the second set of legs on the opposite end of the pipe cleaner coil (see Image 2.2).
Note: We found it easier to add the legs once we placed the body back over the sharpie pen. This prevented our coiled body from losing its shape.
2.4 Now have your kids bend the legs to the style they want for their critter. Are they making a dog that needs longer legs bent near the body, or maybe a chameleon whose legs should go out straight, with only a small bend at the end (see Image 2.3)?
Note: Whatever style leg your kids decide on, this is only a temporary look for the leg. Once the crystals are done forming on the body, and the protective straws removed from the legs, your kids will wrap additional pipe cleaners around the leg and tail areas. The pieces of straw stopped the crystals from forming in those areas, but the pipe cleaner still turned stiff and gritty from the Borax solution.

Tail
2.5 Now have your kids use the 1/2 piece of pipe cleaner leftover from step 2.2 (or another piece of pipe cleaner of similar size if they want a different color) for the tail. Help them wrap the end of the tail around the end of the back-coil section. Twist the end of the tail 2-3 times around the end of the coil for decent support (see Image 2.4).
Note: Your kids will attach the critter’s head after soaking the rest of the body in the Borax solution overnight, so we’ll build that later.
Prep for Borax Solution
2.6 Have your kids cut 4 pieces of straw long enough to cover each of the legs and one slightly longer piece of straw for the tail. Have your kids slide the straws over the legs and tail (see Image 2.5).
Note: The straw only covers the bottom 2/3 of our dog’s tail, allowing the tip of its tail to grow crystals too.
2.7 Once your kids have finished building their pipe cleaner critters and straws are covering any sections where they don’t want crystals to grow, help them tie their critter to a popsicle stick or something similar.
2.8 Your kids can now hang their critter in the container, wrapping any extra thread around the popsicle stick until the critter is hanging at the right height. Nothing should be touching the bottom or sides of the container (see Image 2.6).
Note: We usually looped our thread around the top coil of our critter so it would hang vertically in the container. If your critters are too long for this method, loop the thread around a coil in the center of the critter body so it can hang horizontally.

Borax Crystal Solution
2.9 Measure the amount of water your solution container can hold, then round this amount up to the nearest cup. This is the amount of water you will want to add to your pan (see Image 2.7).
2.10 Bring your pan of water to a boil, then remove from heat (see Image 2.8).
2.11 Add Borax to the hot water, one tablespoon at a time, stirring continuously until the water is fully saturated. Your water will be fully saturated with Borax when it starts to look cloudy and you can see the powder start to settle on the bottom of the pan. We used 6-7 tablespoons of Borax per cup of water for our crystal critters before the water started to look cloudy (see Image 2.9).
Note: If your kids have decided to color their crystals, add the food coloring to your saturated solution now.

2.12 Bring the solution to a boil one more time. This allows the last of the Borax to dissolve since the hotter the water the more Borax it can hold. Plus, you want your solution as hot as possible before pouring it in your container (see Image 2.10).
2.13 Carefully fill your container with the saturated solution, then gently place your pipe cleaner critter in the solution. Rest the popsicle stick on top of the container, twirling the thread around the stick to get the critter at the right height. Make sure that your pipe cleaner critter or the straw pieces aren’t touching the bottom or sides of your container or they will harden to the container as the crystals grow (see Image 2.11).
Note: If one of the straws does end up touching the side or bottom of the container at some point due to movement in the container don’t panic. This happened to us a couple of times and we were able to gently remove the straw from our critters.
2.14 Let the pipe cleaner critter sit in the Borax solution overnight for optimum crystal growth.
Note: You and your kids may want to check on how the crystals are growing periodically. Your crystals may not need to soak overnight, especially if you worked on this project first thing in the morning.
2.15 Once your kids are happy with the size of the crystals on their critter, you should carefully remove it from the container and set it on a rack or paper towel to dry. Trim the thread and gently remove the sections of straw from the legs and tail area (see Image 2.12).
Note: If your kids added food coloring to their Borax solution, you may want to seal the crystals after they dry, otherwise, the food coloring will fade. We used a spray can of clear finish on our Valentine heart geode from The DIY Valentine Crystals Mystery, but you can also use nail polish or another clear sealant you have around your house.

Note: Remember, your kids can easily modify the poses of these critters with slight alterations to their legs or curls in their tail. Help your kids design their dog in a playful ‘downward dog’ pose with a crystal ball designed out of pipe cleaners next to him. Or help them curl the legs of their chameleon inward so it can grab hold of a pencil or small branch.
Leg Attachments
2.16 As we mentioned earlier, the sections of pipe cleaner covered by straws in step 2.6 will be stiff and gritty. How your kids upgrade the legs and tail of their critters is another step where they can use some of their own creativity. The two methods that worked well for us were coils and wrapping.
2.17 Have your kids choose what color pipe cleaner they’d like to use for the legs of their critter, then help them cut it into four equal sections. For our dog, we wrapped each 1/4 length piece of the brown pipe cleaner around a chopstick to create four coiled sections to use in the next step. For our chameleon, we just needed the four equal lengths of green pipe cleaner (see Image 2.13).
2.18 Attach the pipe cleaner leg attachments created in the previous step. If your kids created coils, they should be able to gently twist and slide them over the original four legs. For our chameleon, coils didn’t look right. We preferred wrapping them carefully around the original legs with a few evenly spaced spirals, like the coils, but less springy looking. We bent the ends of our green pipe cleaners to resemble the chameleon’s feet (see Image 2.14).
Tail Attachment
2.19 Have your kids choose what color pipe cleaner they’d like to use for their critter’s tail and shape it if necessary. We needed another 1/4 length piece of brown pipe cleaner for our dog’s tail, and a 1/3 length piece of green pipe cleaner for our chameleon’s tail. We wrapped our green piece of the pipe cleaner around the popsicle stick, then carefully stretched it out to create a longer tail that we curled at the end for the chameleon (see Image 2.15).

2.20 Attach the pipe cleaner tail attachment created in the previous step. If your kids created a coiled tail, they should be able to gently twist and slide it over the original tail, which is how we attached our chameleon’s tail. We wanted a coiled tail attachment for our dog too but had to coil it around the original tail directly because of the crystal tip of our dog’s tail (see Image 2.16).
2.21 Help your kids gather the supplies for their critter’s head. We used pipe cleaners, googly eyes, and Instant Tacky sticky dots to attach the eyes (see Image 2.17).
2.22 We have two different head designs that you can check out below, one for the dog and one for the chameleon. Like we said though, we did struggle a little with our critter heads.
2.23 Help your kids gently insert the end of their critter’s head into the center of their critter’s coiled body, then glue it into place (see Image 2.18).
Dog’s Head
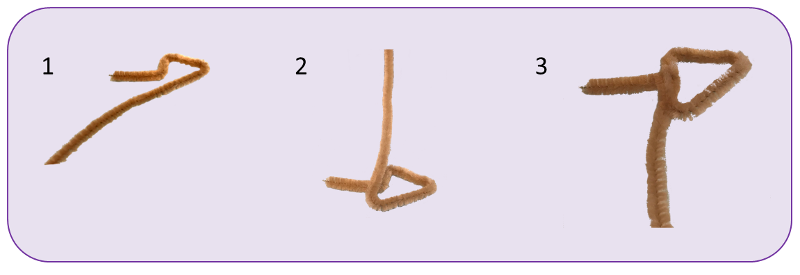
1. The head will be the toughest section for your kids to build on their Crystal Critter. Once your kids have decided on what color of pipe cleaner they’d like to use for their dog’s head, help them bend it so it resembles the pipe cleaner in Step 1 above. This will be the dog’s neck and the first 1/2 of the triangular-shaped outline of his head.
2. Next, your kids need to bend the pipe cleaner as shown in Step 2 above, which will finish the outline of the dog’s head.
Note: Once the pipe cleaner reaches the first half of the outline from Step 1, make sure your kids have the straight section of the pipe cleaner sitting on top of the neck section, not under it.
3. Help your kids fold the straight section of the pipe cleaner around then under the neck section so it looks like the pipe cleaner is Step 3 above. This fold will help hold the dog’s triangular-shaped head together.
Note: The exact length of the neck and the triangular outline of the dog’s head will depend on what size head your kids would like their dog to have. A larger head will just need additional pipe cleaner to finish wrapping around the outline in Step 5 below.
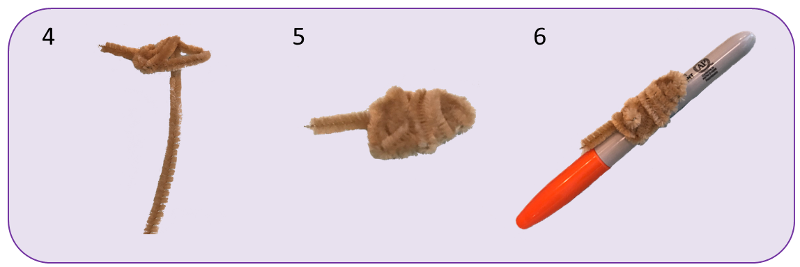
4. Your kids are ready to wrap the rest of the pipe cleaner around the outline of their dog’s head, continuing in an up & over, then under motion as seen in Step 4 above.
Note: Don’t wrap any pipe cleaner around the neck on the left side of the head. This section will be inserted into the center of the coiled body after it’s covered in crystals.
5. Depending on the size of the outline your kids made in Steps 1 & 2, they may need another section of pipe cleaner. This could be a good time for your kids to be creative and make the tip of their dog’s nose a different color. The triangular head should be completely covered as shown in Step 5 above.
Note: It’s hard to see in the image from Step 5, but we tucked the end of the pipe cleaner under one of the loops wrapped around the outline.
6. The main part of the head is done, but it doesn’t really look like a head quite yet. Have your kids gently bend the head around the curve of a marker similar in size to a Sharpie as shown in Step 6 above.

7. If your kids turn the head over, it should have an indentation like the image shown in Step 7 above. If not, they can gently mold the head some more until they like the shape.
8. Once your kids decide on an ear color, help them cut two small sections for the ears. We bent our ears so the top of each ear was wider than the bottom and the tips were bent forward like a puppy’s ears. Insert the ears between the last couple of pipe cleaner loops near the neck and glue them in place as shown in Step 8 above.
9. All that’s left is to attach the googly eyes as shown in Step 9 above. We prefer to use the Instant Tacky sticky dots, but you can use whatever adhesive you have around the house.
Chameleon’s Head
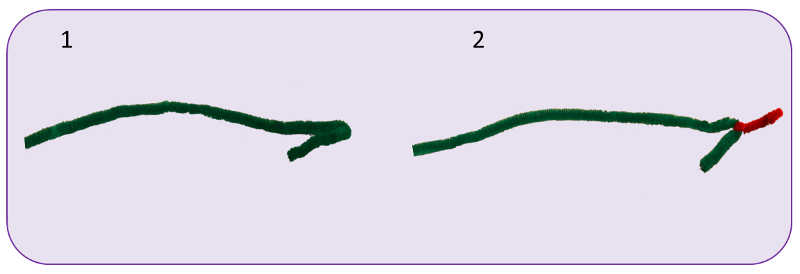
1. Our chameleon’s head isn’t quite as difficult as the dog’s head we just discussed. Let your kids choose a color of pipe cleaner for their chameleon’s head, then help them bend one end of it so it resembles the pipe cleaner in Step 1 above. This will be the chameleon’s neck and part of the outline of its head.
2. Next, your kids need to wrap a small section of a red pipe cleaner around the bent area from the previous step for the chameleon’s tongue, as shown in Step 2 above. We recommend your kids make the tongue long enough to curl at the end.

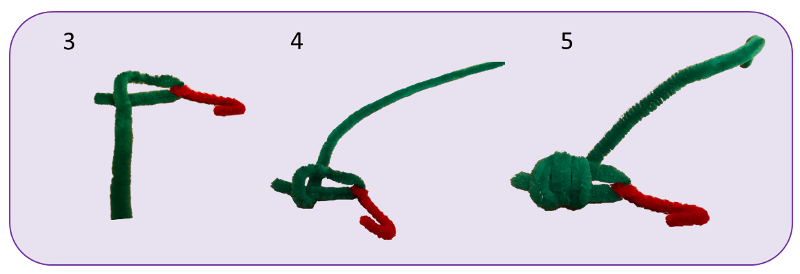
3. Help your kids bend the long section of the pipe cleaner downward so it crosses over the top of the shorter section as shown in Step 3 above.
Note: Keep the area to the left of where the two sections crossed long enough to insert into the chameleon’s coiled body. This area is the chameleon’s neck.
4. Next, your kids need to continue bending the long section of the pipe cleaner by going under the shorter section before heading back up behind the triangular outline of the head that was just formed. Your kids’ head should resemble the image in Step 4 above.
Note: The exact length of the neck and the triangular outline of your kid’s head will depend on what size head they’d like for their chameleon. A larger head will just need additional pipe cleaner to finish wrapping around the outline in Step 5 below.
5. Help your kids bend the long section of the pipe cleaner over the top of the head, down and around to the back again, continuing in the same direction so their head resembles the one in Step 5 above.
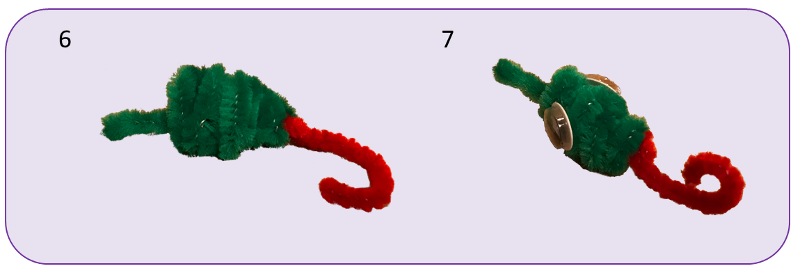
6. Once your kids finish wrapping the pipe cleaner around the outline of the head, be sure they tuck the end under one of the loops they just made. Your kids may need another section of pipe cleaner for this step, depending on the size of their critter’s head (see Step 6 above).
7. All that’s left is to attach the googly eyes as shown in Step 7 above. We prefer to use the Instant Tacky sticky dots, but you can use whatever adhesive you have around the house.
Tips & Tricks
Pipe Cleaner Tips & Tricks
![]() Create a stunning critter with a multi-colored body by twirling two different colored pipe cleaners into one.
Create a stunning critter with a multi-colored body by twirling two different colored pipe cleaners into one.
![]() Pliers are useful when your kids want to make a tight bend in their pipe cleaner, or if you want to bend down a piece of wire sticking out of the pipe cleaner.
Pliers are useful when your kids want to make a tight bend in their pipe cleaner, or if you want to bend down a piece of wire sticking out of the pipe cleaner.
![]() Challenge your kids to pose their critters with accessories to add to the fun.
Challenge your kids to pose their critters with accessories to add to the fun.
Borax Crystal Tips & Tricks
Crystal Size
![]() We liked smaller crystals for our critters, but if your kids want theirs to be larger keep them soaking overnight.
We liked smaller crystals for our critters, but if your kids want theirs to be larger keep them soaking overnight.
![]() Cooling the container of the Borax solution in a pan of hot water will slow down the cooling process, which is another method to grow larger crystals.
Cooling the container of the Borax solution in a pan of hot water will slow down the cooling process, which is another method to grow larger crystals.
Food Coloring
![]() The food coloring used in the Borax solution will fade unless you seal it. We like to use a spray can of clear finish, but you can also use nail polish or another clear sealant you already have around the house.
The food coloring used in the Borax solution will fade unless you seal it. We like to use a spray can of clear finish, but you can also use nail polish or another clear sealant you already have around the house.
![]()
Be sure to add any food coloring after the Borax, otherwise, you won’t be able to see when the Borax solution starts to get cloudy and the extra powder settles on the bottom.
![]()
A lighter-colored solution works better if your kids want to monitor their crystals as they grow. We weren’t able to see through any of the darker solutions we made.
Container Issues
![]() Make sure your pipe cleaner critter doesn’t touch your container while it’s hanging in the saturated solution, or it could adhere to the container as your crystals grow.
Make sure your pipe cleaner critter doesn’t touch your container while it’s hanging in the saturated solution, or it could adhere to the container as your crystals grow.
![]()
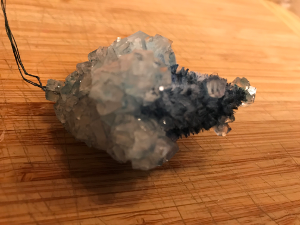
Be careful how you hang any solid body critters in the Borax solution. Crystals don’t like to attach to the underside of a solid pipe cleaner base (see the diamond pipe cleaner base in the image below).
![]() Move the container holding your kid’s critter as little as possible.
Move the container holding your kid’s critter as little as possible.
![]() You may notice that some crystals formed on the bottom and sides of your container. Pouring very hot water over these crystals will speed up your cleanup process.
You may notice that some crystals formed on the bottom and sides of your container. Pouring very hot water over these crystals will speed up your cleanup process.
Misc Issues
![]() If you’re concerned about noticing any of the remaining thread that was used to hold your critters in the Borax solution, try using fishing line instead.
If you’re concerned about noticing any of the remaining thread that was used to hold your critters in the Borax solution, try using fishing line instead.
![]() Your crystals are fragile when they’re wet and just out of the solution, but they will harden as they dry.
Your crystals are fragile when they’re wet and just out of the solution, but they will harden as they dry.
Top of Tab
Top of Post

