We Hope You Enjoy Your DIY Valentine Crystals
Are you and your kids looking for an engaging Valentine’s Day STEM activity? Our DIY Valentine Crystals investigation will take you and your kids deep into the world of crystallization. We researched a variety of methods, using different materials in different scenarios. We had a lot of fun, especially with our heart geode. If you have a rock hound or two in your family, this could be the perfect activity for them.

DIY Borax Valentine Geode Crystals Printable Instructions
DIY Epsom Salt Valentine Crystals Printable Instructions
Safety Warning: Keep all chemicals used in this activity away from younger children. Avoid unnecessary contact, don’t rub it in your eyes, and do not ingest it.
Adult supervision is required for this project.
Crystal growth in rocks can take millions of years to form. While these Valentine crystals won’t take that long, the three crystallization methods we investigated did have to sit overnight.
- The alum powder and Borax crystals should stay in the saturated solution overnight for decent crystal growth.
- The Epsom salt crystals formed in the chilled, saturated solution after just 4-5 hours. However, these finer crystals are easier to handle after drying overnight, so it’s still time-consuming.
Note: Please be aware that you need to boil water during this activity. This may not be possible in a classroom setting.
Do you need another Valentine’s Day STEM activity to do while your kids wait for their crystals to form? Have you decided that the Valentine Crystals won’t work in your classroom setting? If so, check out our Valentine Paper Circuit Mystery investigation. With conductive copper tape, LEDs, and a battery your kids can learn about electronics as they create paper circuit Valentines.
The Science Behind Crystals
Crystals
A crystal is a solid material formed by molecules connected in a repetitive pattern, called a crystal system. If you look at a crystal closely, you will see that it was formed with straight edges and flat surfaces. Mother Nature may need time to form dazzling crystals, but did you know that salt and sugar are manmade crystals?
Crystal System
A crystal system is one of seven categories of crystals classified according to the possible relations of its crystal axes. These categories include the cubic, tetragonal, orthorhombic, trigonal & hexagonal, monoclinic, and triclinic crystal systems. Each system is recognized by the geometric parameters of its unit cell, the simplest repeating unit in the crystal.
Crystal Investigation
Do your kids have access to a magnifying glass or a microscope? Can you get your hands on some crystals? If so, your kids may enjoy doing an investigation of their own. Help them gather the facts, record their observations, and see if they can guess which crystal system they’re looking at. Our Crystal System Guide for Beginners can help them get started. You can also encourage them to go online for additional information.
Don’t forget: Salt and sugar are two common household crystals your kids can start their investigation with. Salt, which is in the cubic system, is made up of tiny cube-shaped crystals. Sugar, which is in the monoclinic system, is made up of oblong-shaped crystals with slanted ends.
DIY VALENTINE CRYSTALS RECIPES
This month, we investigated three popular DIY Crystal recipes. We saw some stunning crystals from each method online, but which of these recipes worked the best? We were surprised to find that all three methods formed amazing crystals for some people, yet for others, the only thing that grew was their kids’ disappointment.
In the end, we decided to test all three methods. We created several alum powder, Borax, and Epsom salt crystals. Unfortunately, these crystals didn’t always turn out how we thought they would. But which crystals were our favorite? Which of the three methods worked best for us? Our Investigation Tab below explains why we preferred the Borax and Epsom salt methods.
Supply List
Borax DIY Valentine Crystals Supply List
| Materials | Tools |
|---|---|
| Borax | Stove or Microwave |
| Pipe Cleaners | Measuring Cup & Tablespoon |
| Water | Stirring utensil |
| Food Coloring - Optional | Scissors |
| Clear Sealant - Optional | Needle & Thread |
| Container for the Crystal Base/Saturated Solution. | Pan or Microwave Safe Dish |
Epsom Salt DIY Valentine Crystals Supply List
| Materials | Tools |
|---|---|
| Epson Salt | Stove or Microwave |
| Water | Measuring Cup & Tablespoon |
| Food Coloring - Optional | Stirring utensil |
| Container for the Saturated Solution | Pan or Microwave Safe Dish |
Investigation
We investigated three popular methods of growing our DIY Valentine crystals. While these methods are very similar, they differ in the main starter ingredient for the crystallization process, and what base the crystals will grow on.
CRYSTAL STARTER

We tested alum powder, Borax, and Epsom salt for our crystal starters. Our research found that not all alum powder is the same. The alum powder crystal method will only work if your powder contains potassium aluminum sulfate. We tested alum powder with and without potassium aluminum sulfate to verify it was needed. It was.
THE WINNER
Borax from our local big box store.
INVESTIGATION RESULTS

» The Borax solution consistently grew the largest crystals.
» Borax was inexpensive and easy to find.
» The Borax crystals had to sit overnight for optimum formation.
» The food coloring used in the solution faded unless we sealed our crystals.

» The Epsom salt solution formed a fine, needle-like crystal when chilled.
» Epsom salt was also inexpensive and easy to find.
» The Epsom salt crystals formed within 4-5 hours if chilled during the process.
» These crystals didn’t need a base to grow on, but they did break easily.
» These crystals didn’t take as long to form but needed to dry overnight to harden completely. Even after drying overnight, these crystals had to be handled gently.
» The food coloring used in the solution also faded unless we sealed these crystals.

» Only alum powder with potassium aluminum sulfate created crystals.
» The alum powder crystals were similar to the Borax crystals.
» Alum powder with potassium aluminum sulfate was more expensive than Borax or Epsom salt, and harder to find.
» The glue needed to attach the dry alum powder to the base didn’t stick well to silicone molds.
» This method took longer because the glued alum powder had to dry completely before moving onto the saturated solution step.
» The silicone molds were too light and tipped over as we poured our solution into our container, contaminating the jar. Unfortunately, these contaminants also started forming crystals, preventing the crystals in our heart-shaped base from reaching their optimum size.
BASE MATERIAL


We tested quite a few materials for the base of our alum powder crystals and several pipe cleaner shapes for our Borax crystals. In the end, the 3D heart and the chain of hearts were our favorites (see above images).
THE WINNER
The 3D heart that was formed out of pipe cleaners. The depth of the inside of our 3D heart resulted in a geode-style crystal formation.
INVESTIGATION RESULTS
» The crystals also grew on the thread holding the pipe cleaners. We liked the crystals on the thread, but an alternative would be to use a fishing line.
» The 3D pipe cleaner base worked best when the pipe cleaners were tightly formed.
» The pipe cleaner base shouldn’t touch your container while hanging in the saturated solution. Otherwise, it could adhere to the container as your crystals grow.
» The crystals didn’t form on the underside of our pipe cleaner bases. We obtained better crystal growth when our pipe cleaner base was hung with the hollow side facing up.
ADDITIONAL INVESTIGATION TIPS
» Add the food coloring to the solution after the Borax. This will allow your kids to see when the solution becomes cloudy and the powder settles on the bottom.
» If you use food coloring, keeping the color lighter will allow your kids to monitor their crystal growth. We couldn’t see through the dark red solution we used with our heart geode.
» If you try alum powder crystals, pour your saturated solution into the container before carefully adding your crystal base.
» Move the container holding your kid’s crystals as little as possible.
» Your crystals may be fragile until they dry and harden completely.
» Any crystals formed on the bottom or sides of your container can be removed with hot water.
Borax Crystals
DIY Borax Valentine Geode Crystals Printable Instructions

The Borax Valentine geode crystals were our favorite crystals, and it’s the method we recommend you try with your kids.
» The finished crystals will be a nice size.
» Once dry, these crystals will be strong enough to be handled by your kids.
» Borax is easy to find and it’s relatively inexpensive to purchase.
We made a 3D pipe cleaner heart for our base, but the Chain of Hearts shown in the picture at the top of this post may be easier for your younger kids. Remember to be careful how you hang your kids’ base. As discussed in our Investigations Tab, there won’t be much crystal formation on the underside of a 3D base.
What’s Happening
During this project, you will help your kids dissolve Borax powder, known as sodium borate, into hot water. You will continue to add Borax to the hot water until the solution has become fully saturated. The solution is fully saturated once the hot water becomes cloudy, and you see powder settle on the bottom of the pan.
As you cool your saturated solution, crystals will appear on your pipe cleaner base. This occurs because hot water can hold more Borax than cold, causing crystals to form as the Borax ‘falls’ out of the solution. The higher the temperature of the water, the more space between molecules, allowing more room for the powder. As the water cools, there’s less room for the powder.
Note: Larger crystals should form if you slow down the cooling process. We placed our container in a pan of hot water during this process.
Step 1: Supplies

Note: Make sure your solution container is large enough to hold your kids’ base.
Step 2: Procedure

2.1 Help your kids create a pipe cleaner shape for their base. Your younger kids may need help with this step since their 3D shapes should be tightly formed for the best crystal formation (see Image 2.1).
Note: We created our 3D heart shape with 5 pipe cleaners and ended up with a nice, dense set of geode-style crystals. We made three pipe cleaner heart outlines, each one a little smaller than the previous one, then wove them together in a stack going from the largest to the smallest heart. We finished our heart by weaving the rest of the pipe cleaners around each other for the bottom of our heart, connecting the bottom to the sides as we went.
2.2 Once your kids have finished their base, help them tie the base to a popsicle stick or something similar. Be sure to tie the thread to the smallest end of your kid’s base so that the largest part of the base is closest to the bottom. As we discussed near the bottom of our Investigations Tab, crystals don’t seem to grow as well on the underside of 3D bases (see Image 2.2).
Note: Crystals tend to grow on the thread as well as the pipe cleaners. If you’d like to prevent this, use a fishing line instead. If your kids want to hang their crystals, a ribbon is sturdier.
2.3 Hang your base in your container, wrapping any extra thread around your popsicle stick until you like the height of your base. A good height is near the bottom half of the container, without touching the bottom or sides. Once you’re happy with the location, tape the thread to the popsicle stick (see Image 2.3).

2.4 Measure the amount of water your solution container can hold, then round this amount up to the nearest cup. This is the amount of water you want to add to your pan (see Image 2.4).
2.5 Bring your pan of water to a boil, then remove from heat (see Image 2.5).
2.6 Add Borax to the hot water, one tablespoon at a time, stirring continuously until the water is fully saturated. Your water will be fully saturated once the water becomes cloudy and you see powder settle on the bottom of the pan (see Image 2.6).
Note: We used 6-7 tablespoons of Borax per cup of water for our geode crystals before our water became fully saturated.

2.7 If your kids want to color their crystals, add the food coloring to the saturated solution now, then bring the solution back to a boil. This will allow the last of the Borax to dissolve since the hotter the water the more Borax it can hold. Plus, you want your solution as hot as possible before pouring it into your container (see Image 2.7).
2.8 Carefully fill your container with the saturated solution, then gently place your pipe cleaner base in the solution until the popsicle stick rests on the top of your container. Be sure the pipe cleaner base isn’t touching the bottom or sides of your container or the pipe cleaners will harden to the container as the crystals grow (see Image 2.8).
2.9 For larger crystals, place your container filled with the saturated solution & base in a pan of hot water so it cools down slowly (see Image 2.9).

2.10 Once the water in the pan from step 2.9 has cooled, carefully remove the container and let it sit overnight for optimum crystal growth. Place the container where your kids can monitor the crystal growth without moving the container (Image 2.10).
2.11 The next morning, carefully remove your kid’s crystals from the container and place them on a rack or paper towel to dry (see Image 2.11).
Note: You can trim the thread and any crystals that grew on it at this time.
2.12 Once your kid’s crystals are dry, you may want to seal them, so the food coloring doesn’t fade. We used a spray can of clear finish, but you can also use nail polish or another clear sealant you have around your house (see Image 2.12).
Epsom Salt Crystals
DIY Epsom Salt Valentine Crystals Printable Instructions

Epsom salt crystals are worth doing with your kids as a lesson on crystallization. The thin, needle-like crystals make a nice contrast to the larger crystals created with the Borax solution. Epsom salt crystals are easy to make, inexpensive, and don’t take as long to form in a chilled solution.
What’s Happening
During this project, you will help your kids dissolve Epsom salt, made up of magnesium sulfate, into hot water. You will use a 1:1 ratio of Epsom salt and hot water to create your saturated solution. You should notice your water turn cloudy, and you may see some Epsom salt crystals settle on the bottom of the pan.
As you cool your saturated solution, crystals will start to form. This occurs because the hot water can hold more salt than cold water, causing crystals to form as the salt ‘falls’ out of the solution. The hot water can hold more than the cold because the higher the temperature of the water, the more space between molecules, allowing more room for the salt.
Step 1: Supplies

Note: You only need a small amount of solution on the bottom of your container.
Step 2: Procedure

2.1 The first step to making some thin, needle-like crystals is to decide how much Epsom salt solution you want to make so you know how much hot water you need. You will use equal parts water and Epsom salt for these crystals, so make sure you have enough salt on hand. Now heat your water. You want the water to be as hot as possible, without boiling (see Image 2.1).
Note: You only need a small amount of solution at the bottom of your container, but you can have more. We filled one of our containers with 2″ of the solution, resulting in a nice red snowball. You may also want to fill several containers, have your kids place them in different environments, and see if they can predict how the differences affect crystal growth.
2.2 Once the water is hot enough, help your kids add the same amount of Epsom salt as they did water, then stir the solution for about two minutes. Remember, you want this to be a 1:1 ratio of water and Epsom salt (see Image 2.2).
2.3 You can now have your kids add the food coloring to the solution and stir it one more time (see Image 2.3).

2.4 Help your kids pour the solution into their container (see Image 2.4).
2.5 Place the container in the refrigerator to chill for 4-5 hours (see Image 2.5).
2.6 After your crystals have formed in the refrigerator for 4-5 hours, drain the excess solution from the container. Then let the crystals dry overnight (see Image 2.6).
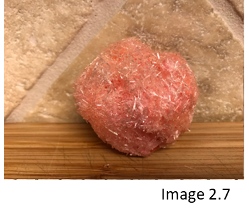
2.7 Hopefully, your Epsom salt crystals came out great (see Image 2.7).